Automate Google Sheets with BotBee Smart Triggers
Google Sheets is often used to track the progress of orders, projects, inventory, and customer records. BotBee Smart Triggers helps you automate these workflows by monitoring changes in specific columns and triggering webhooks whenever your defined conditions are met. No coding or Google Apps Script is required.
BotBee Smart Triggers for Google Sheet:
BotBee Smart Triggers is designed for workflows that depend on changes to existing data. Instead of triggering only when a new row is added, it monitors specific columns and instantly sends a webhook whenever the selected values are updated. This helps you automate status-based workflows without writing any code.
Key Features:
- Detects updates in selected columns.
- Supports column-level monitoring.
- Create conditional automation rules.
- Sends webhooks instantly after changes.
- No coding or Apps Script required.
- Works with CRMs, APIs, AI tools, and automation platforms.
- Fast and reliable real-time automation.
Best Use Cases:
- Send a WhatsApp message when an order status changes to Shipped.
- Notify customers when payment status becomes Paid.
- Update inventory across multiple systems.
- Trigger approval workflows when a manager updates a status.
- Notify teams when a project status changes.
- Start API or AI workflows only when specific values are updated.
Example:
An order whose status was in processing is now shipped.
↓
Status changes from “Processing” to “Shipped”.
↓
A whatsapp message automatically sent “Your order has been shipped”
Installing BotBee Google Sheets Extensions
You can install BotBee Smart Triggers by following this method.
Install from Google Sheets:
- Open your Google Sheet.
- Click Extensions in the top menu.
- Select Add-ons → Get add-ons.
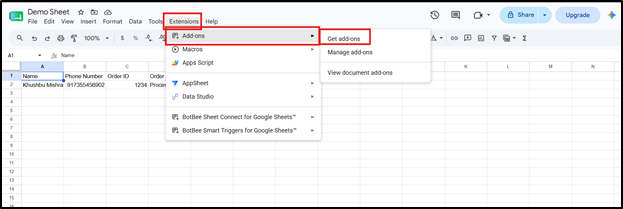
- Search for BotBee and Click Install.
- Review and allow all the required permissions to complete the installation.
BotBee Smart Triggers – Features
Setting up BotBee Smart Triggers is quick and requires just a few steps. Once configured, the extension automatically monitors changes in your selected columns and triggers webhooks based on your settings.
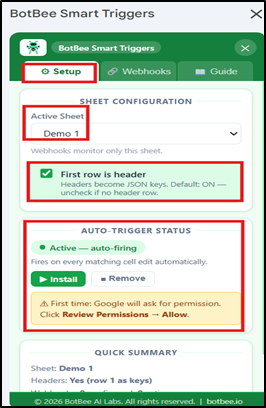
1. Active Sheet: Select the Google Sheet that you want to monitor.
- Changes will only be made in the selected sheet will trigger the webhook.
2. First Row is Header: Enable this option if the first row of your sheet contains column names.
- This allows BotBee to use your header names as JSON keys in the webhook payload, making the data easier to understand.
3. Install Auto Trigger: Click Install Auto Trigger and grant all the required Google permissions.
- Once installed, BotBee can detect updates automatically without any manual action.
Configure Your Webhook:
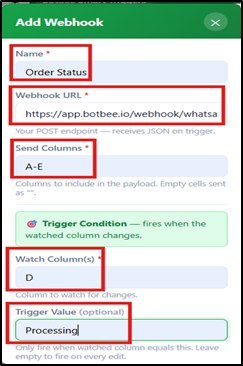
After completing the setup, switch to the Webhooks section and click Add Webhook.
1. Name: Give your webhook a name. Example: Order Status Updates
2. Webhook URL: Paste the webhook URL where you want the updated data to be sent.
3. Watch Column: Enter the column that BotBee should monitor for changes.
- Whenever the value in this column is updated, the webhook will be triggered. Example: If your Order Status is in Column D, enter D as the watch column.
4. Trigger Value (Optional): This field lets you trigger the webhook only when the watched column matches a specific value.
- Leave it blank to trigger the webhook on every update.
- Enter a value to trigger the webhook only when that value is set. Processing – Trigger only when the status changes to Processing.
Example Workflow:
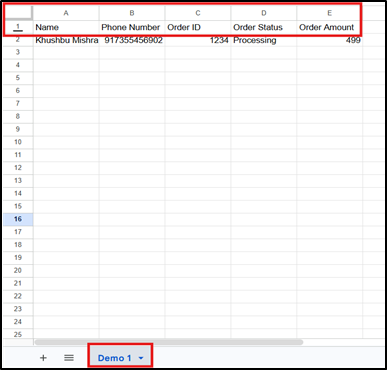
Let's see how BotBee Smart Triggers works with a practical example. We'll use the same Google Sheet, Demo 1, with the following columns: Name, Phone Number, Order ID, Order Status and Order Amount. In this example, we want to trigger a webhook only when the Order Status is updated to "Processing".
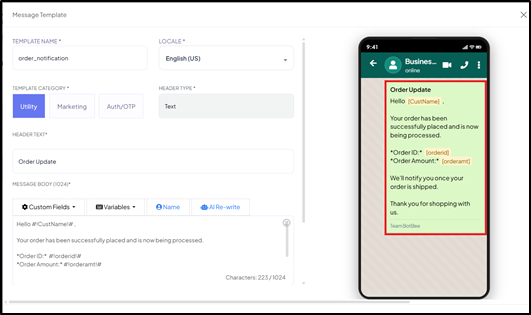
- In BotBee, I’ve already made a message template to send for order placed.
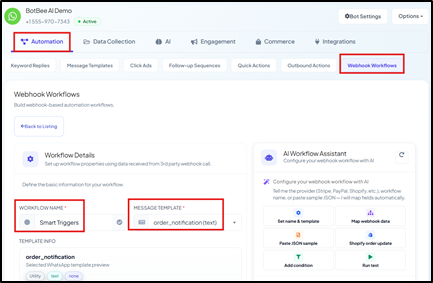
- To get the webhook URL, we’ll go to webhook workflows under bot manager.
- Give a name and select the template.
- Copy the webhook URL provided.
Step 1: Initial Setup:
- Select the Active Sheet: Choose Demo 1 as the Active Sheet.
- Enable First Row Header: Turn First Row is Header ON.
- Install Auto Trigger: Click Install Auto Trigger and grant all the required Google permissions.
Step 2: Webhook Configuration:
- Add a Webhook: Go to the Webhooks section and click Add Webhook.
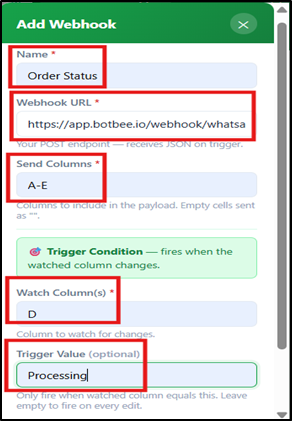
Fill in the details as follows:
- Name: Order Status Updates
- Webhook URL: Paste your webhook URL.
- Watch Column: D (Order Status column)
- Trigger Value: Processing
- This means the webhook will be triggered only when the value in Column D becomes "Processing."
- Save Settings.
Step 3: Test Your Setup:
- Write a demo data in the first row.
- Go back to botbee and click on “Capture Response”
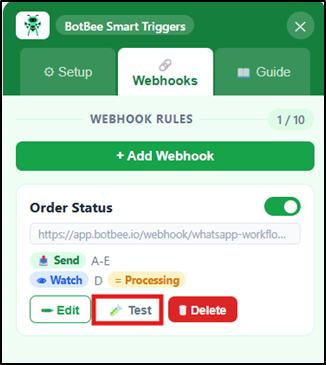
- Click on Test button to send a sample payload and verify that your webhook is receiving the data correctly.
Mapping the data in BotBee:
- Map all the data in BotBee.
- Save the workflow.
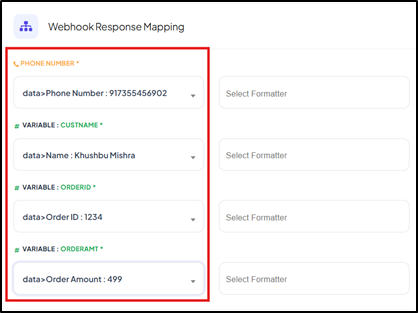
From now as soon as the status changes to Processing, BotBee detects the update and instantly sends template message to the phone number given.
BotBee Smart Triggers helps you automate workflows based on changes to existing data in your Google Sheets. By monitoring specific columns and triggering webhooks only when required, you can streamline status updates, approvals, notifications, and other business processes quickly, efficiently, and without writing any code.
Found this article helpful?
( 3 Out of 12 Found Helpful )