Setting up WhatsApp Chat Widget with BotBee
In today’s fast-paced digital world, instant communication can make or break user engagement. BotBee makes it incredibly simple to add a WhatsApp chat widget to your website allowing visitors to connect with you instantly.
Here’s a step-by-step guide to help you create, customize, and launch your own chat widget.
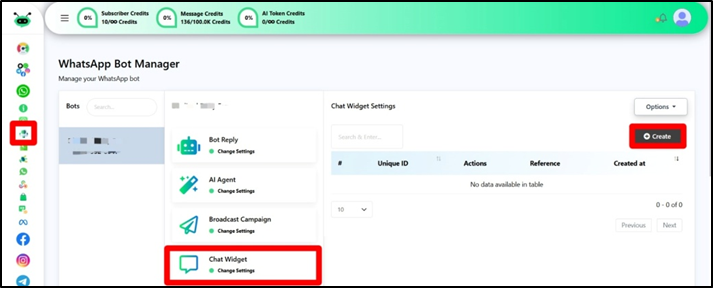
Step 1: Access the Chat Widget Creator:
- Go to BotBee Dashboard.
- Navigate to Bot Manager under WhatsApp Section.
- Click on Chat Widget option.
- Click on Create button.
This will open the Visual Flow Builder.
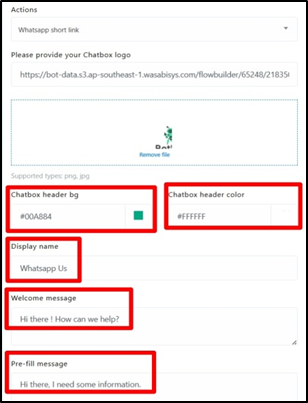
Step 2: Configure Widget Settings:
- Upload your chatbot logo
- Choose a header color using the color picker
- Set your Display Name
- Write a Welcome Message (This will be the message that will appear from your side.)
- Add a Pre-fill Message for users.
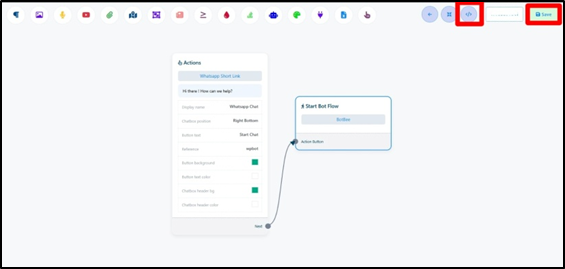
- Choose where the chat bubble will appear on your website.
- You can position it at the top left, bottom left, top right, or bottom right, whatever suits your layout best.
- Fine-tune the position of your chat widget by adjusting the x-axis and y-axis offsets. This lets you control how far from the edges your chat box appears.
- You can choose to keep the chat box open by default to grab attention or closed for a more minimal look.
- Timing: Set a delay (0–60 seconds) for when the widget appears after page load.
- Button Design: Customize text, size, and colors (background, text, hover effects)
- Reference: Add a unique reference ID (only letters and numbers, no spaces or symbols)
- Save the Settings.

- Double-click Start Bot Flow and give it a name.
- Once done, click Save.
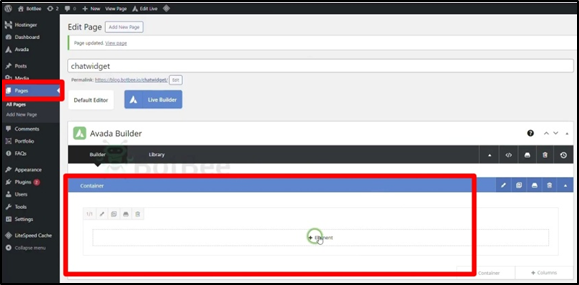
Step 4: Embed on Your Website:
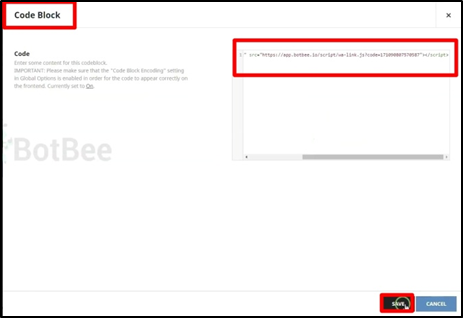
- After saving the bot, Click on Get Embed Code.
- Here we can see a JavaScript code and a shortlink URL to use on emails or share anywhere in the internet, we just need to add this JavaScript code on the website now.
- Copy the JavaScript snippet provided.
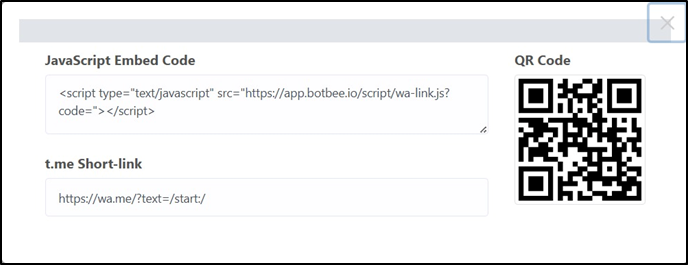
- Paste it into your website’s HTML (usually before the </body> tag)
Step 5: Test and Verify:
Before going live, always test:
- Visit your website and check if the widget appears correctly.
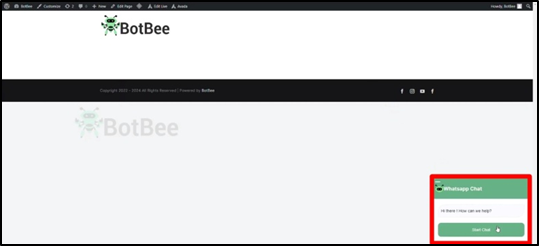
- Interact with it to ensure buttons and replies work smoothly.
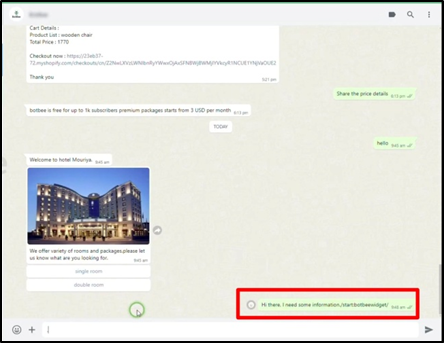
- Anyone who interacts with the widget should automatically appear in your subscriber list.
Final Thoughts
Setting up a WhatsApp chat widget with BotBee isn’t just about adding a chat button it’s about creating a seamless, interactive experience for your users. With proper customization and a well-designed flow, you can turn casual visitors into real conversations and eventually, customers.
Reference Video:
If you prefer video tutorials here are the links:
English: https://youtu.be/-B7twqkfbMs?si=PW51PIsVBL1lbog5
Still Need Help?
If you face difficulties during onboarding:
- Take a screenshot or screen recording.
- Share details with our support team.
Our team will review the onboarding step and guide you further.
Contact: 08069645300
Found this article helpful?
( 0 Out of 0 Found Helpful )